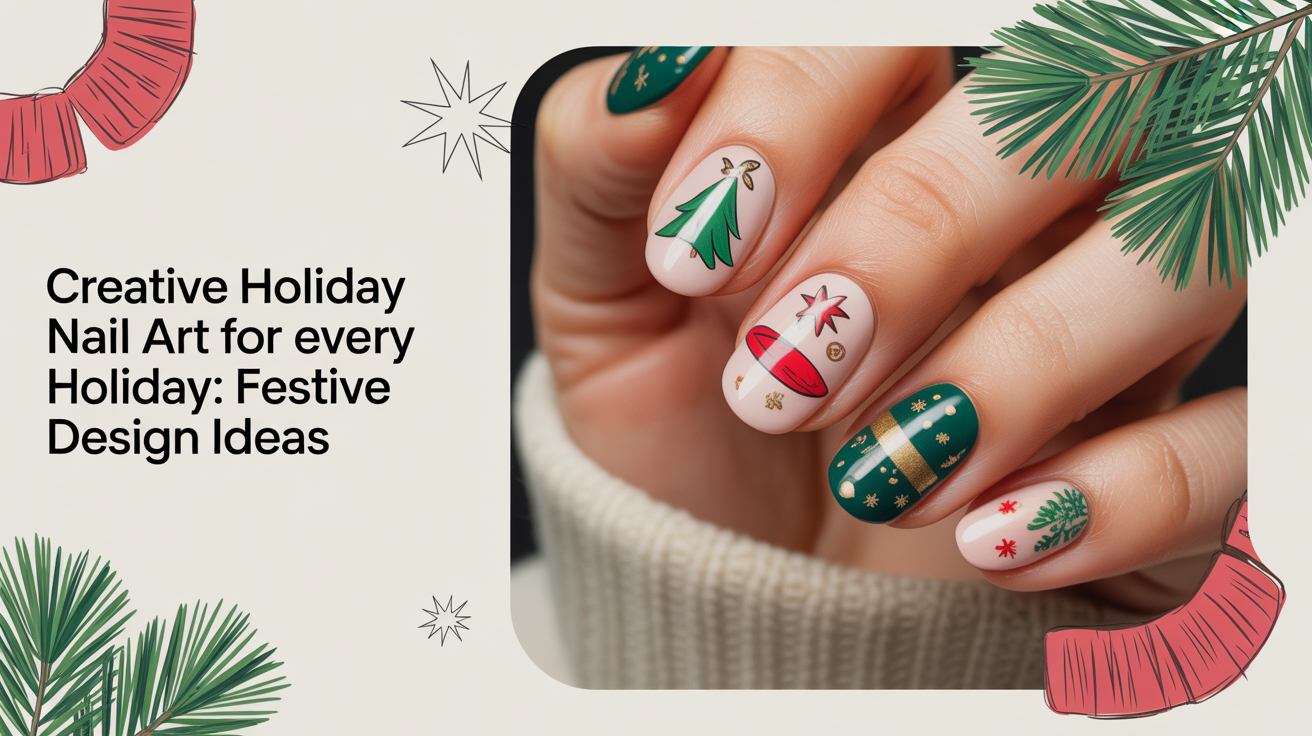
Creative Holiday Nail Art for Every Holiday
Holiday nail art is the easiest way to make your look feel instantly seasonal—without changing your wardrobe. A few well-chosen colors, a tiny symbol or two, and the right finish (glossy, chrome, velvet, matte) can turn a simple manicure into a mini celebration for any date on the calendar. If you want a steady stream of inspiration, browse the latest sets in the Explore gallery and save the designs that match your vibe.
This listicle walks through festive design ideas for major holidays (plus a few “in-between” moments), with options ranging from quick-and-minimal to detailed statement nails. You’ll also get a planning method you can reuse all year, and tips for keeping your manicure crisp for photos and parties.
If you’re building a mood board for the colder months, start with January nail ideas for wintery palettes you can remix into multiple holiday looks.
How to Plan Holiday Nail Art: Colors, Symbols, and Finish
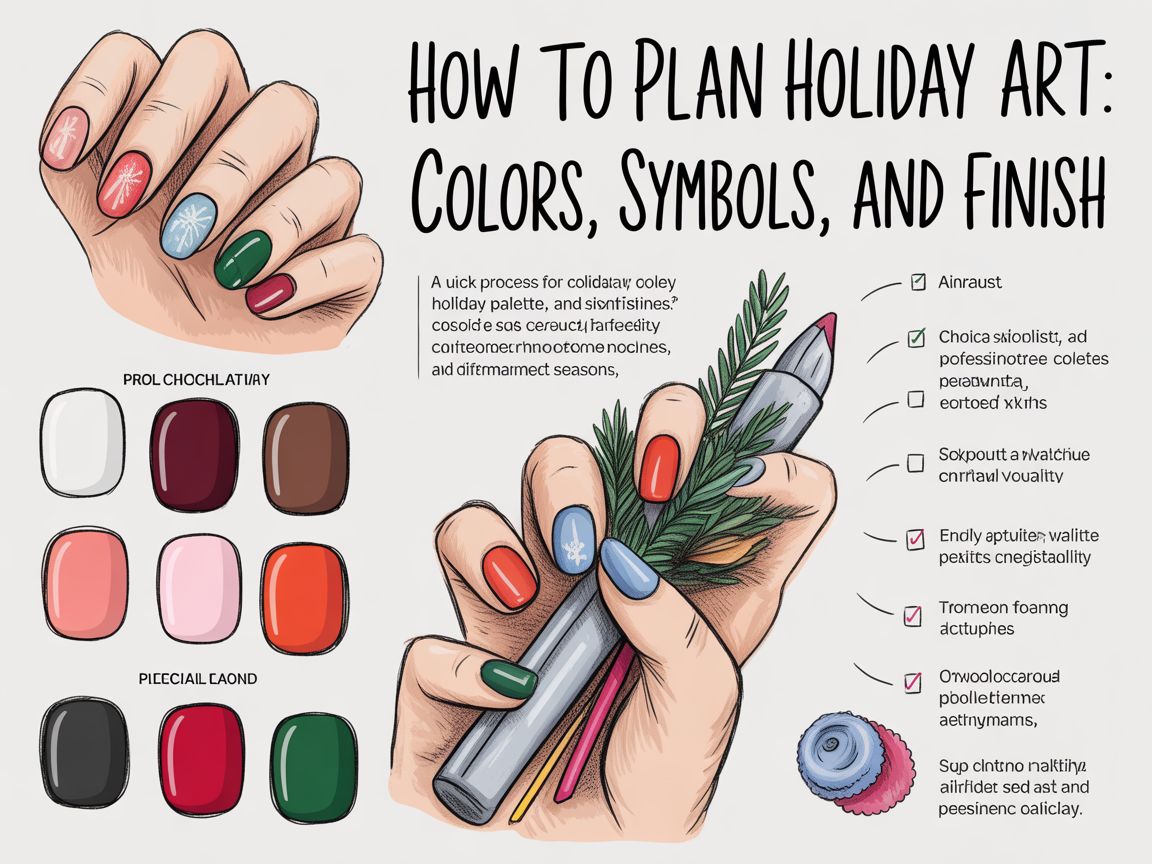
Before you pick a design, lock in three decisions. This quick framework prevents “too much happening” and makes even complex holiday nail art feel cohesive.
1) Choose a palette (2–4 colors)
Pick one “hero” shade, one supporting shade, and one accent.
- Hero: the color people notice first (red, emerald, black, pastel pink).
- Supporting: calms the look (nude, milky white, sheer blush).
- Accent: adds sparkle or contrast (gold foil, silver chrome, neon liner).
Fast palettes you can reuse:
- Winter: deep green + cream + gold
- Spring: lilac + baby blue + white
- Summer: coral + turquoise + citrus yellow
- Fall: burnt orange + espresso + copper
2) Pick 1–2 symbols (keep it readable)
Small icons read best when they’re simple.
- Stars, dots, hearts, bows
- Leaves, flowers, snowflakes
- Ghosts, webs, candy pieces
Tip: If you want multiple motifs, split them by finger (e.g., one icon per accent nail).
3) Decide the finish that sells the theme
Finish is the shortcut to “holiday.”
- Chrome: futuristic New Year’s, winter glam
- Glitter topper: party-ready anything
- Matte: spooky Halloween, cozy fall
- Velvet/cat-eye: luxe winter, romantic Valentine’s
A simple checklist for any holiday look
- Base color on all nails
- Two accent nails with a symbol
- One nail with texture (glitter, chrome, velvet)
- Top coat (glossy or matte) to unify everything
Valentine’s Day: Romantic, Modern, and Not-Too-Sweet
Valentine’s designs don’t have to be all pink hearts. These ideas stay wearable while still looking festive.
Ideas to try
- Micro-heart French tips: nude base, tiny red hearts sitting at the smile line.
- Cherry mocha romance: cocoa brown + soft blush + one small cherry icon.
- Negative-space love notes: sheer base with fine white “envelope” lines and a red seal dot.
- Velvet rose nails: cat-eye magnetic polish over burgundy for a plush, candlelit vibe.
Quick detail upgrades
- Add a single rhinestone at the cuticle of one accent nail.
- Use pink chrome just on the tips for a glazed effect.
- Outline hearts with a thin liner brush so they look crisp, not puffy.
St. Patrick’s Day: Green, Gold, and Lucky Details
This holiday is perfect for experimenting with green without committing to full neon.
Wearable options
- Emerald + gold foil: emerald on most nails, gold foil flakes on one accent.
- Tiny clovers: use a dotting tool to form three dots and pull them into a heart-like clover.
- Rainbow corner: a small rainbow sweep in one corner over a nude base.
- “Lucky” minimalism: a single gold star on a milky base with one green accent nail.
Pro tip for clovers
Paint three dots, then connect the center lightly with a micro brush. Add a short stem last so it doesn’t drag.
Easter & Spring Holidays: Pastels, Florals, and Soft Texture
Spring holiday nail art shines with airy bases and gentle contrasts.
Pastel designs that photograph well
- Speckled egg nails: pastel base (lavender, mint, pale yellow) + irregular black/brown speckles.
- Daisy accents: white petals with a butter-yellow center on one or two nails.
- Jelly pastels: sheer “syrupy” polish layers topped with glossy top coat.
- Bunny French: classic French tips with tiny bunny ears on the tips of two nails.
Keep it clean
Pastels show mess easily. Use a peel-off barrier or clean-up brush with acetone around the cuticle to keep edges sharp.
Fourth of July: Graphic Lines and Firework Sparkle
A red-white-blue manicure can go from costume-y to cool with the right layout.
Fresh takes on the classic palette
- Star confetti over nude: sheer nude base with scattered micro stars in red, white, and blue.
- Diagonal flag tips: slanted French tips with thin stripes instead of full flags.
- Firework bursts: black or navy base with silver “burst” lines using striping brush.
- Chrome accent: one silver chrome nail to modernize the set.
Placement rule
If you’re using stripes, keep them on one or two nails. Let the others be solid colors to avoid visual overload.
Halloween: Spooky-Chic Holiday Nail Art Ideas
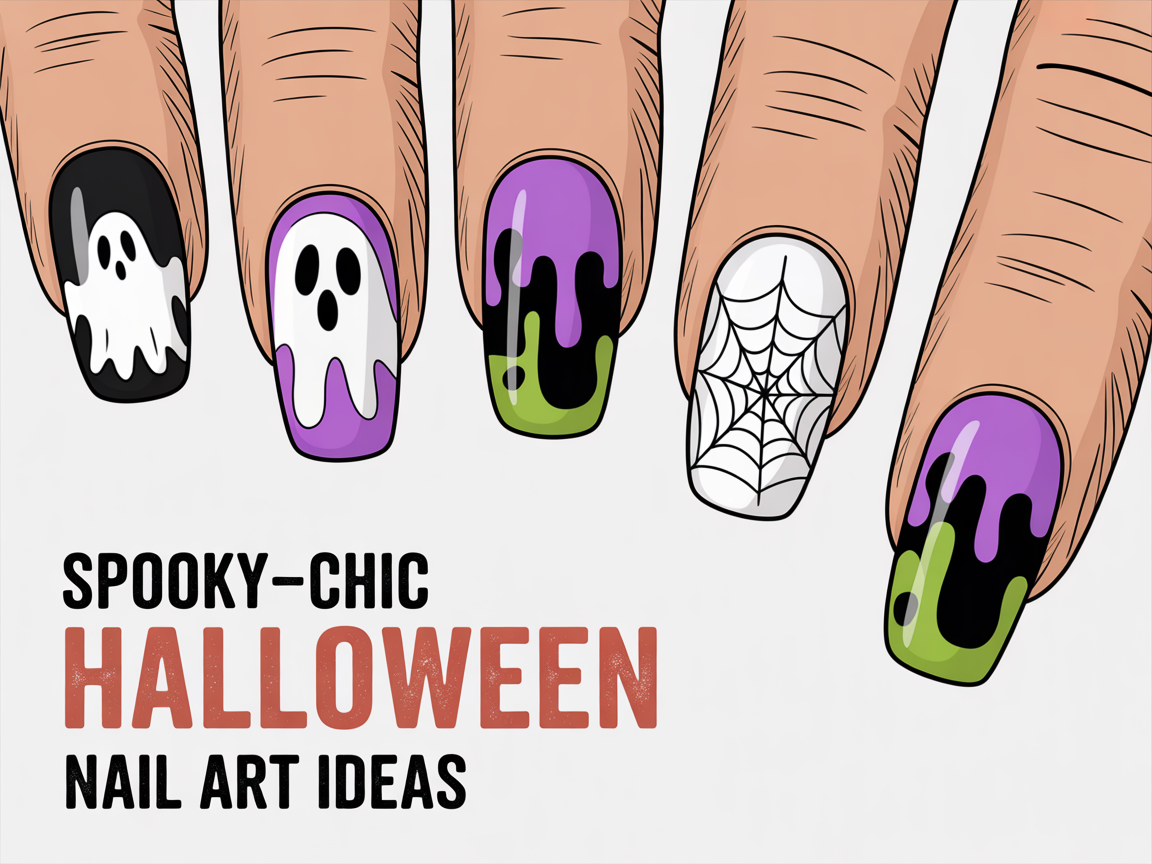
Halloween is the best excuse to play with contrast, matte finishes, and tiny character art.
Easy (10–20 minutes)
- Matte black + glossy drips: paint black, matte top coat, then add glossy “slime” drips on two nails.
- Ghost accents: white ghost blobs on a sheer base, finished with two tiny black eyes.
- Spider web corners: use a thin liner to draw web arcs in one corner over nude.
Medium (30–45 minutes)
- Mismatched monsters: one nail with a stitched smile, one with a mummy wrap, one with a tiny bat.
- Candy corn gradient: sponge white-to-orange-to-yellow, then outline with a thin brown line for definition.
- Aura “haunted glow”: smoky purple aura center on a black or charcoal base.
Advanced (full set statement)
- Glow-in-the-dark outlines: paint icons in white, top with glow gel, then seal.
- 3D blood gems: build clear gel beads tinted red along the cuticle line (keep it tasteful).
- Portrait nails: classic horror silhouettes (cat, witch hat, crescent moon) in negative space.
Color combos that always work
- Black + orange + bone white
- Plum + acid green + silver
- Charcoal + neon purple + glossy top coat
Thanksgiving & Fall Harvest: Cozy Neutrals and Texture
Fall sets are all about warmth and depth.
Cozy ideas
- Tortoiseshell accents: amber jelly layers + thin black swirls (looks salon-level).
- Sweater knit feature nail: use a detail brush to paint raised lines, then matte top coat.
- Pumpkin spice French: nude base, burnt-orange tips, tiny gold dot near the cuticle.
- Leaf outline nails: copper or olive leaf outlines over a milky base.
Texture guide
- Use matte for sweater/knit to read as fabric.
- Add fine shimmer on one nail to mimic candlelight.
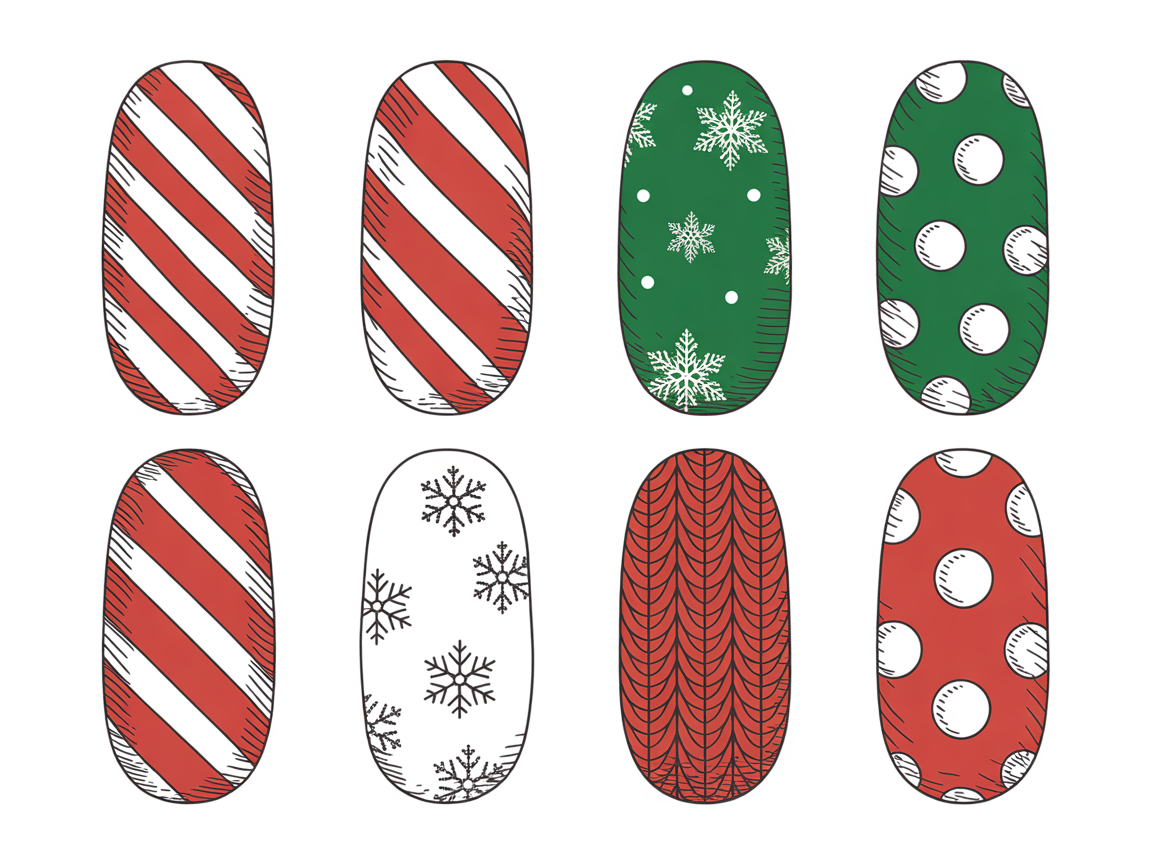
Christmas & Winter Holiday Nail Art Ideas
Winter gives you the widest range: cozy neutrals, icy sparkle, and full glam. If you want more winter sets to reference while you paint, browse a curated board in the Explore winter styles collection and pay attention to how artists balance glitter with bare space.
Classic Christmas (traditional but polished)
- Candy cane tips: white base, red diagonal stripes on the tips. Add one thin green stripe for depth.
- Ornament dots: deep green base with metallic dots and tiny hanging-string lines.
- Holly accent: two green leaves + three red berry dots on one nail.
Icy winter (not holiday-specific)
- Snowflake negative space: sheer base with white snowflakes and a silver center dot.
- Frosted chrome: pearl chrome on two nails, milky white on the rest.
- Ice-blue aura: soft blue aura center with micro-glitter top coat.
Cozy sweater sets
- Knit + plaid mix: one matte knit nail, one plaid nail, the rest solid cream.
- Hot cocoa nails: cocoa brown with a tiny marshmallow square on one accent.
Mini how-to: candy cane stripes that don’t wobble
- Paint a fully opaque white base and cure/dry.
- Use striping tape or a long liner brush for diagonal guides.
- Paint thin red lines first, then fill if needed.
- Seal with glossy top coat so the stripes look “wrapped.”
New Year’s Eve: Metallics, Confetti, and Minimal Glam
New Year’s designs should sparkle under low light.
Party-ready ideas
- Black + gold foil: black base, gold foil on two nails, then a thin gold outline on one nail.
- Champagne chrome: nude base with champagne chrome tips.
- Confetti dots: clear base with mixed-size glitter dots clustered near the tips.
- Clock strike accent: a single nail with two thin “hands” meeting at midnight.
Make glitter look expensive
Keep glitter in a gradient (heavy at tip, lighter toward the cuticle). That negative space is what makes it modern.
Bonus Mini-Holidays: Quick Ideas for Any Calendar Moment
Not every celebration has a “standard” nail look. These quick themes still read as seasonal.
Birthday nails
- One glitter candle accent (thin line + flame dot)
- Confetti French tips
Graduation nails
- Black-and-gold micro French
- Tiny cap icon on one nail
Vacation nails
- Citrus slices, palm silhouettes, ocean aura
- Neon outline French on a sheer base
Cozy weekend / self-care day
- Milky nude + glossy top coat
- Soft lavender with one pearl accent
Tools, Tips, and Mistakes to Avoid (So Designs Last)
Holiday nail art looks best when the basics are solid. A few technique tweaks can make your set last through dinners, travel, and photos.
What helps most
- Cap the free edge: swipe color and top coat across the nail tip to reduce chipping.
- Use thin layers: thick paint floods cuticles and blurs small details.
- Let layers set: when you rush, details smear and lines wobble.
Common mistakes
- Too many accents: three “statement” nails plus glitter plus stickers usually reads messy.
- Icons too large: small symbols look more chic and are easier to place neatly.
- Skipping a detail brush: for stripes, webs, and snowflakes, a liner brush changes everything.
A simple formula that never fails
- 7 nails: solid color
- 2 nails: one icon each
- 1 nail: texture (glitter/chrome/velvet)
Conclusion
Great holiday nail art isn’t about doing the most—it’s about choosing a clear palette, repeating one or two symbols, and using finish to make the theme feel intentional. Whether you go minimalist with micro icons or full glam with chrome and glitter, you can rotate these ideas through Valentine’s, Halloween, and winter celebrations without starting from scratch. Keep the layout balanced, seal your details well, and you’ll have holiday nail art that looks festive for every holiday on your calendar.
Ready to start designing? You can create your free account to save inspiration and generate new seasonal nail looks anytime.